How To Create The Perfect Gallery Wall
Source: Rooms For Rent
Creating a gallery wall can be a fun and creative way to add visual interest to any room. There are two main types of gallery walls that you can create to showcase your favorite art pieces or photographs. One of the most popular options is the symmetrical gallery wall, where each frame is identical in size and shape. The arrangement typically follows a grid-like structure with equal spacing between each frame. This style of gallery wall can create a clean and organized look in a room and is popular in contemporary and minimalist design aesthetics.
Another option is the asymmetrical gallery wall, which is a more eclectic mix of frames and artwork arranged in an organic or haphazard way, but visually pleasing. These frames often vary in size and orientation. This type of gallery wall can add visual interest and personality to a room, and can be a great way to display a collection of artwork or photographs without having to adhere to a strict grid or layout.
Below we walk you through exactly how to create each type of gallery wall to produce a perfect curated look, no matter what your style is.
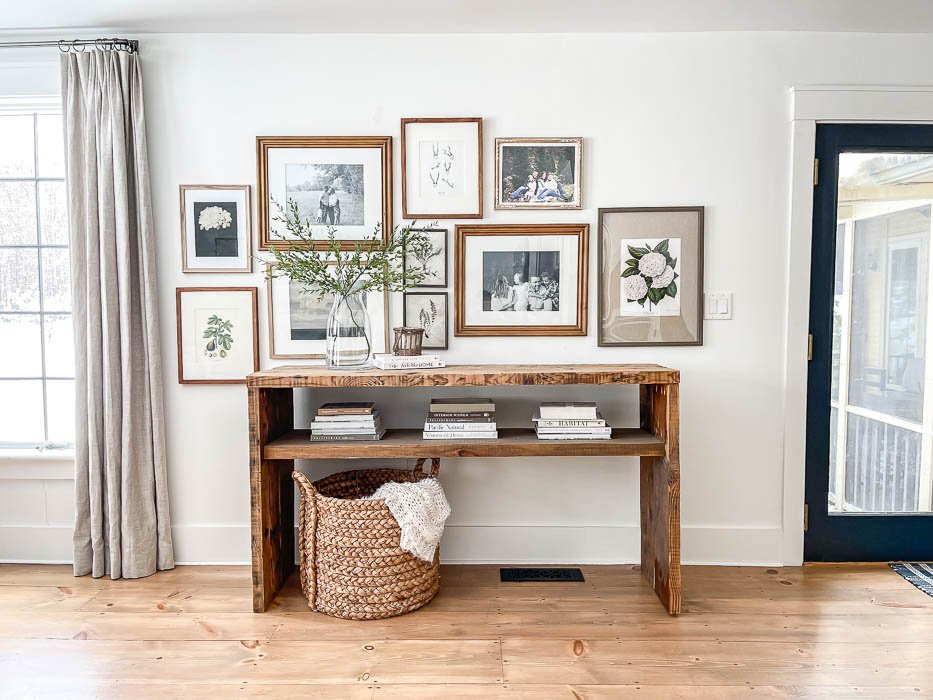
Source: Jenna Sue Design
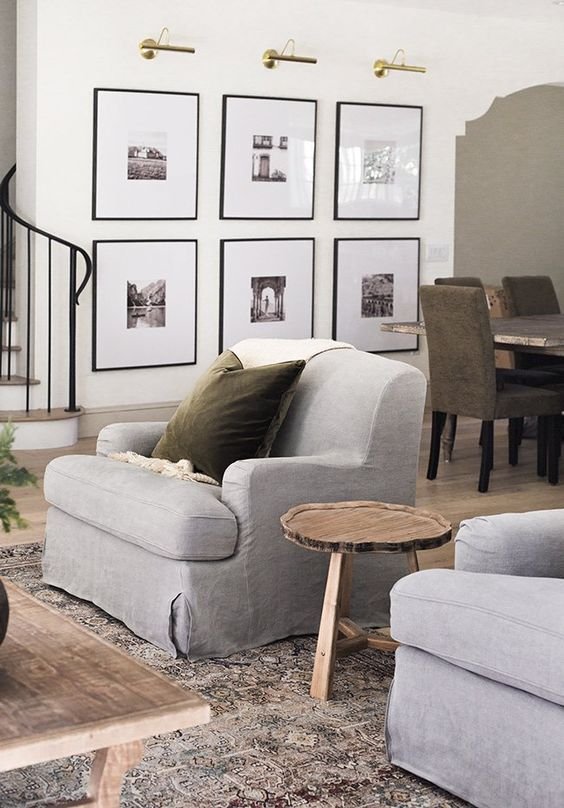
Symmetrical Gallery Wall
We love a clean modern symmetrical gallery wall. This frame set up creates the perfect spot for a set of botanical prints or family photos. To create a streamlined gallery wall you will want to make sure that your frame size, frame style, and frame content are all consistent to create a cohesive, sophisticated, and intentional look.
Select your frame: Choose frames that complement your decor and the size of your wall. You will want to select the same size frame for all of the frames in the set. For a high-end look, we recommend using extra wide mat frames.
Choose your art: Select art that you love and that fits within the frames you have chosen. This can include photographs, prints, paintings, and other wall decor. Whatever you choose you will want to make sure that each framed piece is consistent and cohesive with all of the art or photographs in the set.
Lay out your design: Arrange your frames on the floor or a large table to determine the best layout. Creating a symmetrical grid is your goal.
Hang your frames: Once you have your design, it's time to hang your frames. We recommend spacing your frames equally apart 2-6 inches from each other. We've found 3-4 inches to be the sweet spot. When hanging art on an empty wall, the rule of thumb is that the mid-point of your art should be between 57 - 60.” Measure up from the floor approximately 60" and let that be the midpoint between all of your frames.
Here are some of our favorite botanical print sets and wide mat frames for a symmetrical gallery wall.

Asymmetrical Gallery Wall
Asymmetrical walls are not easy, but they are a great option for collectors & those who love to express their creativity. To create an eclectic asymmetrical gallery wall your frame size, frame style, and frame content do not have to be consistent - this is a great place to get creative and intentionally curate a space that is true to you.
Choose a variety of artwork: This can include paintings, photographs, prints, or any other pieces that you want to display. Make sure to choose pieces that are different sizes and shapes to add visual interest. When it comes to selecting art for your wall we recommend choosing a large pattern (bold/colorful), small pattern (more white space), and solid (something simple or abstract).
Select your frames: You will select your frames and frame sizes based off of the art that you select. You can have fun here and use a mix of sizes and styles to create the look you are going for.
Lay out your design: Arrange the framed artwork on the floor in a way that you find visually appealing. We recommend using the arch method -see image above. Drawing two arches (in pencil or painters tape) on your wall and then placing frames of different size, shape, frame width, etc. above and below the arches. Once you have your layout, trace each piece onto paper and cut it out. Label each piece with its corresponding artwork. Use painter's tape to arrange the paper cutouts on the wall in the same layout as you had on the floor.
Hang Your Frames: Once you have the paper cutouts arranged on the wall, use a level and a hammer to hang each piece of artwork in its corresponding spot. Just like with a symmetrical gallery wall you will want to measure up from the floor approximately 60" and let that be the midpoint between all of your frames.
Here are some of our favorite digital prints and frame sets for an asymmetrical gallery wall.
Pro Tip: Gallery walls are expensive and can be time consuming to figure out! Be sure you have the proper funds to successfully pull off a gallery wall. Using resources like FrameBridge can help you create pre-calculated asymmetrical gallery walls even supplying the frames so all you have to do is fill art/photos.
Work 1:1 With One Of Our Expert Virtual Interior Designers
Work with a Homzie virtual interior designer to create a customized shoppable design plan tailored to your needs, style, and budget. All for a low flat-room rate.